Thursday, November 8, 2012

What to do with a pumpkin?

Halloween is over....sigh...

And what are you to do with the pumpkins you bought?
Perhaps they were for the kids to carve out...perhaps just a fall themed decoration?

Well I'm here to help you decide what to do with these enormous squashes!


First you take the pumpkins and wash the exterior of nicely...pat dry.


Chop off the stem and slice in half.
The next part should be easy...gut the gourd just like you would if you were carving a pumpkin!
Reserve the seeds in a separate container.
(To save time, have 2 bins going...one for guts and one for mostly seeds)


The flesh of the pumpkin is soft, but its coated in a slimy, sinuey substance.
Scrape this substance off with a big metal spoon and discard.

The flesh is now ready for roasting.
Place the pieces, inside down, on a deep roasting dish with some water.
Bake at 325 degrees for about an hour or until the flesh is mushy and soft.


Use a metal spoon to carve the flesh away from the deep orange rind.
You can portion the flesh out for future use.
Spoon mush into 1 cup cups and freeze in a freezer bag.
Or you can just spoon the flesh into a large container and freeze the whole thing.
You can opt to use a food processor to blend the mush further before freezing if you wish.
(If you blend the mush, it becomes very tricky to get it to stay in the 1 cup forms until frozen)

Use this mush when ever it calls for canned pumpkin.
Use in baking muffins, loaves or pies.

Whatever you do, it is a very healthy vegetable!  Loaded with iron, fibre, vitamin A & C and actually contains calcium...

If you prefer roasted pumpkin, skip the whole roasting process and cleave flesh from rind raw.
Chop into 1 inch cubes and freeze in large freezer bags.
Roast later with other root vegetables for a great winter side dish!

For a list of 10 intriguing pumpkin recipes, check out this link to Food.com


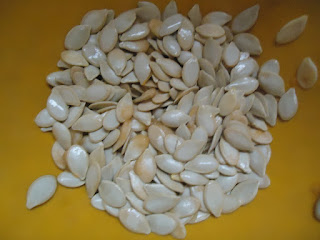
A fantastic use for pumpkins is the seeds!!!


Take the container you used for the seeds and rinse the seeds very well.
Take care to remove all orange and stringy bits.
Let seeds soak for a bit in the fresh cold water.


Spread out on a baking sheet or stone.
Add 2-3 tbsp of butter or marg and a bunch of grinds of coarse salt.
You can use parchment paper under if you wish.
Bake at 300 degrees for approx 45 mins (if you use a stone, it will be sooner!)
Just keep checking on them every now and again, giving a stir along the way.


What you have is a great snack that is loaded with fibre, vitamin E and manganese!

You can also adjust the taste of this snack just by sprinkling on a different spice...

Try these:

-garlic powder
-onion powder
-cayenne pepper
-chili powder
-cinnamon & brown sugar

Alternatively, you can also switch up the taste by using other seeds like squash or sunflower.


How do you like your pumpkin?


Friday, November 2, 2012

Pickin Punkins...and other Fall things...

Every year we buy pumpkins locally...that is, when we aren't growing them of course!

I try to avoid the big box stores...there is something weird about paying 99 cents for a big pumpkin...
It's mostly to support the local growers, but its also weird to see something so giant be so cheap.


So we drove a short way to Silverbrook's Garden Center at 3071 Rutledge Rd  in Sydenham.


It was the Friday before Hurricane Sandy hit.
They were calling for storms, high winds and of course rain.

For some reason, Friday didn't listen and it was GORGEOUS!

The sun was shining...the air was warm...like spring.


Owen was all over the pumpkins.
Picking out a proper pumpkin is like a scientific process.


And heavy!


We loaded up one of the push carts that Silverbrook offers its customers.
Here's Owen already dreaming about the things we shall carve into them.
Not to mention the pies we'll make and the seeds we'll roast!


Silverbrooks also had some pretty cool looking squashes and gourds.
(Great for natural decorating for your centerpiece!)


The funniest part of the trip was when Owen spied a huge box of apples.
They had a few kinds to choose from but Owen dove right in to the Empire apples.
(medium sweet apples)
The lady was just about to say that Owen could try one...but he was already munching away...

We grabbed 8 pumpkins in total as well as a basket of apples.

Silverbrook is a wonderful spot...we love to go there on occassion to buy seedlings that we don't start from seed, antiques, candles and other produce as it comes into season.
It really has an old fashioned feel to the place.  Like you've stepped back in time.
No one is wearing costumes, but you'll be pleased with the personable service and friendly folks you'll meet.

The pumpkins we bought went right into our front yard for decorating, but now that Halloween is over, I'll be bringing them in for a future post on how to cook and prepare pumpkin mash for the freezer for baking.
Not to mention a post on roasting seeds!

The apples are already gone...they were good!!!

Where did you get your pumpkins?

Wednesday, October 24, 2012

In celebration...2 Years and Counting...

In celebration of this blog officially turning 2 years old...

I thought I would have another contest!


So here goes:

You get your pick of the following books shipped directly to you!

Sorry, you can't look inside of the above pic...that's amazon.com's fault.
However, if you really want this book, I'll make sure it will be autographed by Mr Brill himself!
You may remember my post on Steve Brill and his amazing foraging awesomeness...

My original post:


I've said it before, so I'll say it again...The Mathers are great!
If you want an introductory book about gardening in eastern Ontario that covers just about everything you'd want to know...this is the book you want!

Previous post on this great book:


Another great grab from The Mathers is the informative book shown below:
(also available for this contest)


This book is great even if you've only dreamed of being self sufficient...but a great guide if you have real intentions of becoming so.  Chock full of Mather humour!!!


Again, you can't look inside this one either.
However if you could...you'd discover a sweet sweet book about growing from a child's perspective.
A sure favorite of my son Owen.  (his review "9 thumbs up")

My original post on Peggy's book:


Rebecca Lerner is a fantastic gal who amazes me with every post on her blog.
She resides in Seatlle and writes about all sorts of foraging.
(she won me over with her post about making MEAD...oh yeah, she rocks!)
I have yet to mention her in an offical post, sadly. (will rectify that in 2013 for sure!)

Here is her blog:


Any of these books would be a great addition to your library,
or a fantastic holiday gift for the gardener/forager in your life!
There is also a selection for the wee gardener in training...

All you have to do is tell me a story...and which book you want.

Yup, that's it!

A short story (let's keep it under 500 words) that answers the question "who is your guru?"

Who inspires you to grow more or experiment in the outdoors? 
Who have you learned the most from in your life?

Let's make Nov 15th be the deadline, so the prizes get shipped well before that holiday is upon us!

Wednesday, October 17, 2012

Pizza! 3 ways to make it for the whole family....

So, like most people, we LOVE pizza.

What I don't like, is not knowing what is really going into my pizza.

I also don't like the price...
and the fact that we live in the country and can't get more than 1 company to deliver to us!

So I decided to pull out the ol' bread maker and stop whining.
(You can still make this recipe without the bread maker...but its more manual work)

With the bread maker, it really was easier than I would have expected!

Here is the dough recipe:

3/4 cup plus 1 tbsp water (80 degrees F, 27 degrees C)
2 tbsp veg oil
2 cups flour
1/2 tsp sugar
1/2 tsp salt
2 tsp active dry yeast (or 1 1/2 tsp bread machine yeast)

I can't stress enough how important it is to follow the directions exactly!
When you use a bread machine, you have to add the ingredients in exactly the manner they tell you.

step 1.  add water, veg oil to bread pan
step 2. add flour, sugar, salt to pan.  Tap ingredients to settle.  Level ingredients and push flour mixture to the corners of the pan. 
step 3.  Make a "well" in the center of the dry ingredients and add yeast.
step 4.  lock pan into bread machine, close cover and set timer to "dough".

THAT'S IT!

The bread machine now does the work of mixing and punching the dough.

I decided to double the above recipe and make a few kinds of pizzas to show you the variety of flavours you can acheive by making your own pizza!


Of course there is the traditional cheese, sauce and pepperoni pizza.
I make this one for all of us, but mainly wee Master Owen.
Owen is 5 yrs old and adventurous doesn't describe his taste buds.

This one is by far the easiest.  Brush on sauce, add pepperoni slices, top with
shredded mozzerella cheese and bake for 15 mins.  Voila!


Noah is 11 yrs old and is starting to expand his taste buds these days.
He is much more receptive to a slice of spinach and feta pizza than Owen.

For this one you have to make the stuff in 2 stages.
Fry onions and garlic in a bit of oil.
Add huge fists of spinach and simmer until wilted.
Artfully place the whole mess on a pizza dough already brushed with sauce.
Crumble feta on top and add some shredded mozzerella cheese if you wish.

If you skip the cheese, this qualifies as vegetarian or good for Meatfree Mondays.
Bake for 15mins and enjoy!


Stemming from my years in Toronto, I grew to love non-traditional pizzas.
There was a fantastic place in Kensington Market that served all kinds.
Gluten-free, dairy-free and definitely not taste-free!


In honour of those days, I made a potato, carmelized onion and rosemary pizza.
(I also had loads of rosemary still outside and needed to do something with it...)

If you skip the cheese, this also qualifies as vegetarian or good for Meatfree Mondays.
This recipe called for the dough to be grilled...which in hindsite I should have done.
This one still turned out fine, but I can see it should have been crispier.

Wash and pat dry some potatoes.
Pierce and nuke for 1-2 mins.
Slice into 5mm slices and set aside.
Carmelize onions in some oil.
Brush dough with oil and fry for 2 mins on one side.  Then flip and add potatoes & onions.
Top with fresh rosemary and parmesan cheese.  S & P to taste.
(recipe called for fontina cheese, but either cheese works well)

Grill in oil on a flat grill and serve!


There are 3 excellent recipes for pizza made in your home, but the list can go on and on.
The main ingredients for the dough don't cost a lot if you space them out over several grocery trips.  Best part is, once you have the stuff...it seems to last for a long time.  (even the yeast lasts if kept in the fridge)

Stock up and have homemade pizzas all winter long...
without worrying if the pizza guy will make it to your door in the snow!

Friday, October 12, 2012

Take a hike....2012

One fall afternoon...

The air was just right.  The breeze was calling me.

The trees beckoned.


A small bird watched as the thoughts came to me...its time to explore the backyard!


First, start by selecting the appropriate trekking clothing.
Long pants, a must.
Sturdy hiking shoes...that is something that is a personal preference.
I like low riding shoes as I like my ankles to have loads of moving room.
Some folks like the ones that allow the support for those ankles.
If you go for the high top hiking shoes, make sure you were them around a bit to break them in BEFORE you trek.  It will help in the long run, I promise.


I also like to don a long sleeved shirt and a vest of some sort.
Wear shorter sleeves if you dare.
I discovered that we have burrs of several types in our property.
(One type as shown above)

Don't pick your best stuff as they will more than likely get wrecked somehow.


I was enjoying the relatively warm balmy weather of September
when I wrote this post...so don't be asking me why the leaves haven't changed yet...
Most of our leaves have changed colour and allowed the wind to blow them from
their lofty homes up in the tree tops.

Our backyard beyond the firepit is very over-grown and wonderful.

It sparks my imagination in ways that haven't been tickled since childhood.
The days of tree forts and expeditions into the wild.

I'm more cautious now and respectful of nature.

It still gets my imagination going...just in new ways now.


I found plants on my property that need identifying!

There was this one above that stood about 1/2 a foot tall.
It had a tubular stem, grass-like clusters of leaves starting at the base
and a tall collection of orange berries on top.


Some wild plant that looked like cilantro.
The flowers on this one was beautiful!


A tall cluster of dried something!

(By the way, I also wear gloves...just in case something I touch
might cause a reaction...we have scads of poison ivy on our property
as well as some poison sumac here and there)


Not sure if this will be white like poison sumac or if the berries will turn blue like
these other plants on our property.
It also seemed late for either of those things...


The berries were close to the ground stemming from a plant
pictured above.
(You can also see some of the baby oaks on our property
in that pic...wondering what kind of oak we have...)


I also found some of the above pictured
pretty purple wild flowers.

I'm not much one for flowers but I appreciate when nature sprinkles them
everywhere.

I had almost forgotten how the flowers leave us in the fall, only to
have nature give us sheets of purple asters everywhere I look.


Grab a pair of sturdy shoes and get outside for a hike.
Explore your own property.
Inspect the hidden corners you never think about.

Nature has surprises waiting for you...


Monday, October 1, 2012

Winemaking with your own grapes!

One of the best feelings is getting a recipe from someone.

I especially like getting the recipes that have been handed down for generations.

We were given a recipe for wine...and when we moved into a house with concord grapes well established...we could hardly resist.

Everything starting coming together, like the universe wanted us to make our own vino!


Test any of these out...if you dare!


The grapes were picked and mashed.
The boys apparently had a hilarious time mashing with feet in plastic bags.
Camera was AWOL at the time...


We borrowed some carboys...


Ches is some sort of engineering genius...
Tupperware, black electric tape and showerhead hose.

The two weeks we had to wait were almost too much.
The suspense was killing us...


On the two week annisersary, we used the dishwasher on a cycle with
white vinegar just to sanitize the operation.


Another high-tech contraption.
Restaurant grade strainer (borrowed) and
a camping cooler (washed out in the bathtub)


Pouring into the coolers to strain repeatedly turned out to be
a lot more work than we intended...but you can't turn back at this point!


A corker in action...also borrowed.
The bottles and corks were purchased in Kingston at Cask & Keg at Bayridge & Princess.
The guy was so impressed we didn't use a kit that he threw in the corks for free...
Then wished us luck!


We started running out of bottles (I only bought 30),
so we started using just about any glass container not nailed down.

I started calling it Desert Lake Hooch.

It's been a few weeks since bottling and we've enjoyed a bottle here and there.
It's especially nice when you're sitting next to the fireplace on a cool night.

If I were to comment on what it takes like...
I'd have to say it tastes more like a hard fruit juice than it does wine.
Some bottles are sweeter than others.  Some bottle blew their corks sitting in our basement.
It really does prove to be true...you need head room between your liquids and your cork.

The funny part was when one shot out in the basement, hit the ceiling...right under my head while I was sleeping.
It sounded like a shot gun...which actually didn't surprise me...it's duck hunting season in my area.


We will definitely be reading up on wine making and growing wine making grapes.
Hopefully we will have a better idea of what we're doing by next spring...
That is...if we don't spend the winter drinking our wine...and forgetting to research...


Has anyone made their own wine? 

I'd love to hear about your lessons learned and stories!

Thursday, September 27, 2012

Baked Flying Saucers - Mexican Style!

Its been a while since I did a recipe post...

In case you are wondering, I have been posting those all to my facebook page and group.
(It just seemed to happen like that this summer)

But I promise to stop that and even things out a bit!

We raided my mother in law's garden recently,
grabbing stuff that was just finishing up.

Like more flying saucer squash!

Ideally you want to pick those squashes when they are fist sized,
but like zucchinis, if you blink, they will grow to enormous proportions!


What you see above is ONE paddypan squash!

We halved it and scooped out the seeds and inner flesh.


What you get left over looks kinda like when you scoop out a pumpkin!
You can dry these seeds and roast them in butter and salt just like pumpkin seeds,
but we rinsed the seeds and dried them off for planting next year.


In a frying pan, we added cooked brown/wild rice, black beans drained and rinsed, roma tomatoes chopped and seeded, yellow tomatoes chopped and seeded, pressed garlic, 1 chopped white onion and spices.  The spices include cumin, cayenne powder, S & P to taste.

Cook off the mixture until the moisture is all but gone.


Fill the squashes, top with shredded cheese and bake at 350 degrees C for 30-40 mins.
Each half served one.

AMAZING!

Super healthy and filling for these cool fall evenings.
This dish also qualifies for Meat-Free Monday!

This dish is easily a meal in itself but you can serve it with a small green salad or cucumber/tomato salad.

I was STUFFED with just the squash...(pun intended)

Anyway, check out my facebook group or page (link beside this post)
for more tips, tricks, recipes and photos from other readers and their garden creations!

Enjoy this wonderful fall!

Monday, September 24, 2012

Update from the property...

So the days are getting shorter and the nights are getting cooler.

We have been fully engulfed in making way for next years' plans.

In the works:

Making room for a fruit orchard, chicken coop, seed saving and getting the full garden going.


One side of our property provides the shelter of pre existing trees...but we've been discovering that most of the trees we thought we had...are actually dead tree trunks with thousands of vines growing up them.

The result is a bunch of trees that appear to have foliage...tricky mother nature!

Our plans include apple, pear and cherry trees.
I need to research what types are hardier for cool climates.
I need to learn about cross pollination,
some types won't produce if your don't have a couple of more than one type around.


I also drafted next year's water barrel structure.
It still needs the ends evened up with a saw and nailed or screwed together.

Elevating the water barrels will provide nature force to the stream of water from the barrel faucets.


The dead trees we've been removing from the scrobs around the edges of our property became a huge store of kindling and logs for our fireplace.

We're pretty stoked about that...as it is one step towards not caring if the power goes out.


We were given these crates by some guys staying at Desert Lake Resort.
The were elevator guys working in Kingston for a few months.
The crates were actually boxes for shipping their parts for the elevators.
The guys left them for us for burning, but I had other ideas!


Another thing we're waiting on is our potatoes!
I think I forgot to mention our composter experiment.

When we moved we found a bag of potatoes that had started growing.
We threw them in this composter and started filling it with top soil
every now and again.

The top soil is now about 4-5 rows of holes up the barrel!
The idea is that when the tops start to die off, we'll empty the dirt out of the barrel.

Ideally we'll have a big pile of potatoes too!


Perfect for storage this winter!


I'm still toying with some locations for a cold storage at this new house.

I have a couple of candidates but I want to monitor the temp fluctuations throughout the seasons.
I also want to monitor if these locations have any moisture issues.
I had a spot in mind, but the roof over top of it might leak during heavy rains through an air vent.

These are all things I prefer to investigate prior to losing a whole harvest to pests, mold or rot.
I can't think of anything more disappointing.

I've also been saving some seeds too!
So far I've cleaned and dried canteloupe seeds and green onion seed bulbs.


So as the leaves change colour, don't forget to enjoy all that fall has to offer:

-Pumpkins and squashs
-apple cider
-apple pies & crisps
-using nutmeg and cinnamon in your cooking (they taste like fall to me)
-root vegetables, roasted & buttered
-warm wooly sweaters
-thick socks
-cool evening walks in the woods
-the smell of campfires or wood stoves