Showing posts with label basil. Show all posts

Tuesday, July 24, 2012

Garden Update: Making due...

This could possibly be the first year I have not had some sort of a garden...

It has not been easy for me.


Above pictured is our proposed garden space for next season.  It seems like an eternity to me sometimes.
Certainly everytime I go to the grocery store and have to buy things I used to get for free in my backyard.

It stings a bit at the checkout too.

However...in true Pedersen fashion...we are making the best with what we have!


We started a number of containers with herbs.

My mother in law donated a whole herd of plants!

Crazy stuff like lime basil and purple basil.


The living mint plant I bought from the grocery store in march still lives!


Ches turned the back part of the old garden patch and planted all of the gifted plants.

Tomatoes a plenty!  Romas, cherry, beefsteaks and yellow plum tomatoes.
  

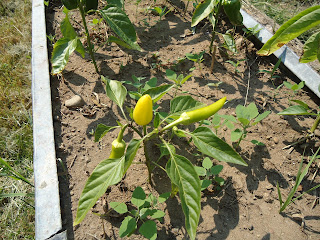
Our pepper plants went into an old metal container we found next to the garage.

Repositioned at the end of the big garden , we have a bunch of pepper types growing.


Yellow wax hot peppers...


Also regular green bell peppers.

It's amazing what you can do with a little imagination!

So the garden efforts are a bit hampered this year, they are not spent!

There are other things happening on our property that were pre-existing.


The concord grapes are coming along nicely (we think)...we've never grown grapes before!

I plan on reading up on their care this winter, but for now we are just marveling at how they grow.


Another thing we seem to have plenty of, in all of the areas with disturbed soil, is lamb's quarter.

Lamb's quarter is one of those wild edibles you never forget once you identify them. 

We're seeing it in all of those containers pictured at the top, basically anywhere we used the free topsoil from my husband's parents property.

You can use lamb's quarter like you use spinach, either steamed or raw.

I seem to only like the young leaves in salads...other wise the leaves of just about any age plant (before flowering) are good cooked.  The reportedly have astronomical health benefits.


How are your gardens doing?

Be sure to post pictures of your gardens and bounties on my facebook page!

Sunday, January 22, 2012

These are the Herbs I know...

Herbs are a delicious way to add something special to a meal.

Its hard though...some people don't know enough about herbs to feel confident using them in their cooking.

Here is a post on the herbs I tend to use the most.

Dill:

Dill is a surprising spice.  I always see it mentioned with fresh fish in shore lunch menus.  Dill is so much more than just pickling and fish spices.  (Although both of those are fine places for Dill)  I add Dill to things that I want to have a smooth buttery flavour.  I add it to egg salad mixture or omelettes.  Its dreamy.  You can sprinkle it on popcorn for a low sodium treat.  Baked potatoes are good with Dill too.


Thyme:

I just discovereed this herb.  I never really knew what the flavour was supposed to be.  When you smell the fresh stuff its easy to tell.  My Hubbie says it smells like Italian cooking.  I add it to tomato-based soups and in baking for a savoury smell.  I recently added it to cormeal breakfast muffins with excellent results!  Thyme is an excellent source of vitamin K and iron.  In herbal medicine, Thyme is used to treat menstrual symptoms and for body aches and pains. Its also my friend's beautiful daughter's name.


Coriander:

I'm learning to appreciate cilantro...the fresh green leaves of the coriander plant (they go so well with fresh tomatoes that I swear they are having a love affair in my mouth!)  But for me, the whole reason to grow this plant is for the lemony seeds called Coriander.  When you put this dried seed in a grinder, it makes a slightly crunchy, lemony, citrusy flavour in your meals.  I especially use it in homemade hummus.  I eat it most days with vegetable sticks or nan bread.  A feel good choice compared to chips and dip.


Chives:

Chives are one of the wonderful things that grow in our garden and we had nothing to do with it!  We found it growing in our main garden patch and transplanted it into our bed beside the bbq.  Nothing beats a warm baked potato with butter sprinkled with freshly cut chives from you doorstep.  Easy gardening at its finest.  If you need extra incentive to use chives...know that you can use them almost anywhere you would normally like a flavour of onion. 


Rosemary:

For me, Rosemary is synonmous with pork.  My mom used to cook this juicy pork tenderloin crusted with a rosemary garlic rub that was awesome!  Recently I discovered its uses in balsamic vinegrettes, on roasted root vegetables, and in roasted chickens.  They also kick eggs on their ass.  Don't be discouraged by the pine needle smell.  Cooking releases some of the awesome power of rosemary.  Use the essential oil for Rosemary and calm yourself.  The fresh leaves also aid in digestion.


Mint:

Mint is for drinks and desserts!  Any herb you can candy...is fine by me!  Seems like if you have fresh mint and add it to your cooking, you are immediately a gourmet.  We fell in love with Moroccan Mint tea, introduced by our friends from Montreal.  It's just green tea with fresh mint and 5 tbsps of white sugar...brought to a boil and served piping hot.  SO GOOD!  It's the tea that got our 10 yr old Noah to start drinking herbal teas.  You can also add a new dimension to desserts by adding a candied mint sprig to a frozen treat.  You can also make daquiris and add a sprig there too.  It could all be growing in a pot at your front door.  Really, Mint would be the one herb I think everyone should have growing somewhere.  The fresh leaves aid in digestion, soothe colic, and relieve flatulence!  Harvest before the plant flowers and you recieve maximum mint flavour

Parsley:

Is the only herb I know that freshens your breathe while you chew it!  I add parsley to almost everything if I have it on hand.  Its a plant that can grow all spring, summer and fall if properly cared for.  Top salads, stick in sandwiches, season entrees with it.  Add it everywhere for a fresh splash of green.  It has vitamin K, C, A, iron, and calcium.  Parsley also helps in digestion.  Growing it close to sensitive things in your garden can also keep away garden pests.


Basil:

Is a gardener's must!  The smell of it raw or cooking is devine.  It makes your kitchen smell like a gourmet restaurant without even trying.  To me, it smells like everything I love about cooking in the country.  Its simple.  We've even come across purple basil and lemon basil.  Like with all Bsil, you must catch the tender leaves before the whole plant goes to flower.  Once it flowers, the whole plant gets bitter...no matter what flavour you originally bought.  Turns out, Basil is also good for you!  High in vitmain K, iron, calcium, vitamin A and C, manganese, magnesium, and potassium.  Eat your pesto...its good for you too!  Try serving on crackers or fresh bread and top with chopped tomatoes for a garlicky snack.

Speaking of pesto...here's a grest recipe we use for jarring pesto sauce for the winter.  We use basil and parsley from our garden.  We never have great luck with garlic, so we bought some from the Verona Garlic festival.  We use either pine nuts or walnuts.  Both are acceptible nuts, each bringing their own flavour to the sauce.  Parmesan cheese is a key ingredient. 

2 qt fresh basil leaves
1 1/2 cups of olive oil
2 oz pine nuts or walnuts, toasted
6 cloves garlic
1 1/ tsp salt
5 oz grated parmesan cheese
1 1/2 oz romano cheese (or more parmesan)

Put basil, oil, nuts, garlic and salt in a blender.  Blend until chunky.  Transfer to a bowl and add cheese.  Mix together.  Pour over warm pasta noodles and serve.


If you are storing the sauce to eat later...add to jars leaving 1/4 in space before the lid.   Seal immediately.  If you are really a die-hard you can do the whole double boiling thing to seal the jars too.  Our method has worked in a cupboard, root cellar or freezer!

I love jarring food because you can store it in a cupboard and as long as it doesn't get too warm and it has a good seal, it will last for years.  No electricity required!


Saturday, October 8, 2011

Chicken and Swiss Chard Noodle Pesto

Our gardening season for 2011 may be coming to a close....but the garden itself is still kicking out all sorts of yummy things.  Most days we have a hard time keeping up with eating all of it!  That's when we're fortunate to have lots of friends who are willing to take these free vegetables off our hands...tee hee!


The other day, Hubbie asked me if I could make those swiss chard pesto noodles.  I was a little surprised...as I wasn't sure how good they were the first time I made them.  I guess they were a hit, when they are getting a second request!


I thought I would go over that recipe in more detail...as I think I glossed over it largely in the the 3 recipe post a while back.  First you need an enormous pile of swiss chard.  I'm not even kidding here.  The bigger the better!!!  This stuff wilts down to almost nothing....and I almost always underestimate.


Fortunately this time we had prepared pesto on hand.  Hubbie made it with basil from our herb tub.  He used walnuts instead of pinenuts...as that was all we had on hand.  Now is actually a good time to be collecting walnuts...if anyone has a walnut tree and would like to get rid of their pesky walnuts...LET ME KNOW!!!

Originally with the pesto chard noodles...I used garlic, oil, walnuts, parmesan cheese and basil directly on the noodles...this time I just spooned the mixture over the chard liberally...which was not necessarily a good thing...


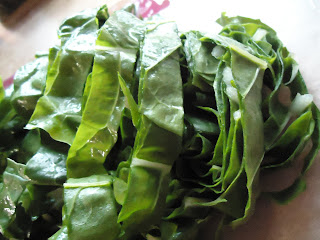
Here is a shot of the chard cut into "noodles".  I wash the leaves, rinsed them, then shake off most of the excess moisture (or you could use a salad spinner).  I remove the ribs of the chard...Hubbie always reminds me I can leave them in...but I only do that when I want the water chestnut texture in my dish....not this time though....


Next we took all the meat off of a whole roasted chicken from Costco...the in-laws buy them for us now and again...and it's always a welcome treat!


Here I wish I owned a wok...as the biggest frying pan we own doesn't quite seem to do it.  Swiss chard was spilling everywhere.  I added a touch of pesto sauce to the bottom of the pan and started warming it up.


At some point the chard wilts down enough to fit into the pan.  I then realize how this dish is lacking in colour...so I dice up a yellow zucchini and throw it in too!  It is also at this point that I start to notice how much liquid is in the pan.  It occurs to me that by spooning on the pesto...I've added too much oil to this dish...next time I'll use more restraint when adding the pesto mixture!


I started heating up the pulled chicken pieces in another frying pan with lemon juice, S & P.


I layer the swiss chard noodles and zucchini on the bottom of the plate, next the chicken, then chopped up parsley on top.  I also halved some cherry tomatoes and threw them at the plate after all was said and done.

The cherry tomatoes added more colour and were nicely warmed by the hot meal.  (I had trouble taking pics of this dish....the steam kept fogging up my camera lens!) 

This dish is EASY, healthy, colourful and warming.  I feel healthier after eating all of that dark, rich, green matter.  I understand this to be a very low carb meal...but kept wondering if a piece of toast or crusty bread would have gone nicely with this dish.  

What is the healthiest meal you've ever made fresh out of the garden?

Monday, August 22, 2011

Recipe Feature...3 meals in one post!

I've been away all week again...so I find the post ideas have been piling up...

I was about to make 3 posts with a lot of details about each meal.  Instead...I want my readers to get the most bang for their buck.  Here is a post that features 3 hit meals from the past week.  All were delicious.  Some were planned, some were accidental...some used recipes, some were made up on the spot.

Here are the delectible servings of seasonal, easy and CHEAP meals (they all required at least ONE ingredient that DIDN'T come from the backyard).


Dinner last Sunday, some for family and some for friends

Aubergine & Courgette Bake

1 large eggplant
2 Tbsp olive oil
1 large onion (chopped)
2 garlic cloves (crushed)
2 lbs tomatoes (peeled and chopped)
a handful of fresh basil leaves (chopped)
1 Tbsp fresh parsley (chopped)
2 zucchinis (sliced lengthwise)

whole wheat flour for coating
shredded mozzarella
parmesan cheese

1.  Slice the eggplant, sprinkle with salt and set aside for 45-60  min.
2.  Heat the olive oil in a large frying pan.  Fry the onion and garlic for 3-4 minutes until softened.  Stir in the tomatoes, half the basil and the parsley.  Bring to a boil.  Reduce the heat and cook, stirring, for 25-35 minutes until sauce has thickened.  Mash the tomatoe to a pulp.
3.  Rinse and dry the eggplant.  Dust the eggplant and zucchinis with the flour.
4.  Heat more olive oil in another frying pan and fry the eggplant slices and zucchini slices until golden brown.  Set aside.
5.  Preheat the oven to 350 degrees.  Butter an overproof dish.  Put a layer of eggplant, the zucchini in the dish, pour a layer of sauce and scatter with some mozzarella.  Sprinkle over most of the remaining basil and parsley.  Repeat the layers, ending with mozzarella.  Sprinkle with the parmesan and remaining herbs on top and bake for 30-35 minutes.  Serve at once.
(REF:  The Complete Encyclopedia of Vegetables and Vegetarian Cooking, by Roz Denny & Christine Ingram, 1997)


Saturday Lunch at Home


Swiss chard noodles with Pesto sauce

a dozen large leaves of Swiss chard, sliced in long lenths
walnuts
3 Tbsp olive oil
1 onion cut in lengths
2 cloves garlic crushed
handful of basil leaves
a tsp of parmesan
handful of cherry tomatoes as topping
whole wheat bagels toasted with butter & a dash of parmesan
S & P

Fry up the onions and walnuts in some of the oil.  Add garlic and chard and simmer.  Grind salt over the whole mess.  Add basil and some of the parmesan.  Heat and serve in bowls with cherry tomatoes and toasted bagels.  Top greens with more parmesan.  


Dinner on Saturday night

Squash and Tomatoes on noodles

1 Flying saucer squash
1 pit red and black cherry tomatoes
2 cloves garlic
1 1/2 cups chopped chicken breast
2 tbsp fresh oregano and parsley
2 tbsp olive oil
spaghetti noodles
shredded cheddar
S & P


Microwave the chopped flying saucers for 2 minutes.  Fry up the heated squashes in olive oil until browned.  Add garlic and chicken and simmer for 5 min.  Add sliced cherry tomatoes, oregano, parsley, salt and pepper.  Simmer a 5 more minutes.  Serve over noodles and top with shredded cheddar. 


REVIEW:

These meals were a hit each time.  Each dish hit a different flavour of the season.  The first recipe was wonderful but WAY too much oven and frying for a hot summer day.  I could see me making that dish and freezing it for a fresh taste of summer in the mid-winter season (not sure how these ingredients would stand up to freezing...but worth a shot!).  The second two recipes were completely made up from stuff we needed to eat up.  Both required a minimal amount of frying and served up hot and fresh.  

If you wonderful readers make this dish, let me know, post a pic of your creation on my facebook page!  Lets all share our accomplishments.  

That's me...saving the planet one low carbon footprint meal at a time... 

Thursday, November 25, 2010

Tomato Basil Soup from Scratch

Here is another edition of Freezer Food!

So Campbell's Soup sells tomato soup for $0.75 these days...and although I can't compete with that pirce...I can feel good knowing that I can control the amount of sodium and sugar in my family's food as well as making a meal that has virtually no carbon footprint!  If we had a wood stove, this recipe would have an even smaller foodprint. 

For storage, we take our best tomatoes and cut a cross in the bottom skin (instead of peeling them fresh).  Add them to a large freezer bag and there you go!  Another storage trick I thought I'd try this year was from the Mathers.  Pick fresh basil place in  a food processor.  Add garlic too.  Now add a 1/2 cup to a small freezer bag and press thin.  Freeze.  Now when you want to add basil and garlic to a meal, you just snap off what you want.  Easy!

Read below for my step by step tomato soup from scratch recipe!

We pulled out the frozen tomatoes at around 10am.
We let them simmer, covered, on very low for a long time. 
After the tomatoes have turned to mush, you can add the frozen basil garlic combo and desired salt.  I also added a pinch of white sugar to combat a bit of the bitterness from our tomatoes.
Press soup through a strainer to get rid of excess seeds and skin.
Parmesan cheese is a suggested topping.

I served them with home made biscuits.  (the heart shape is optional....but fun!  Can't you feel the love?)

Ready for lunch!


left: basil garlic frozen in baggie, middle: home made biscuits, right: mater soup!