Sunday, March 9, 2014

Tapping those Sugar Maples....part 2

Part 1 was originally posted last winter...

...we now return to our show!


Collecting the sap has proven to be the easiest part of the process!
Filtering and storing the sap is tricky, but can be done.
The best comparison I've found is milk.
You must store the unprocessed sap like you would milk.
You have to keep it cool but not frozen.


We kept the sap in the snowbank in sealed buckets.


Cover them up too...


Fantastic Husband then constructed a very basic module for processing the sap.
He took our copper firepit and loaded it with wood.
Around the firepit, he placed several green logs (wood not seasoned/dried) for use as supports.
On top of those green logs, he placed a door from a fence we disassembled on the property.
He filled some large pots with the sap and boiled slowly for about a day.


He collected, stored and processed sap for about 2 weeks before his enthusiasm diminished.
That's about when the sap started running like CRAZY.

He asked me one night...should I keep collecting sap?
He felt obliged to the trees to continue tapping.
My response was simple...if you are asking the question, then you've already made up your mind.

Quit now (while you're ahead) before the whole experience makes you bitter.


After the sap boiled outside for the day,
he would bring the pots inside to continue to boil the sap down on the stove top.
That's when the process becomes very tricky.

We went through a whole batch before someone mentioned adding milk.
Something we hadn't really read about...or read and didn't really believe that was a necessary step.
The sap has dusty sediment called affectionately called sugar dust.
It isn't harmful...but it also isn't pretty.
You add the milk towards the end and it miraculously clarifies the sap.
You end up with a more translucent sap!

If you boil the sap too long, you get candy instead of syrup.
The only item we neglected to pick up before starting this endeavour was a candy thermometer.
I mean, how many opportunities do you have to use a candy thermometer?!?!
(Not much in our house...there's already too much store bought stuff)

I never would have thought we would be tapping maple trees...and yet there we were...

Ah well,  the first batch was a bit thick.
The second, third and fourth batches were much better!
Above you can see the difference in colour between batches.
The longer you wait in the tapping season, the darker the colour of syrup.

We put the thicker candy-like syrup on some snow.
Made Husband and I feel like we kids all over again.

(The actual kids loved it too)


We used to have a family tradition of eating pancakes on Saturday mornings.
That was before I became a shift-working, part timer.
Most of my shift happen on the weekends now, but we still have wonderful memories.
Pancakes on snowy mornings...

We decided to try something a little different this year.

French Toast!

Owen helped while I observed.


The fresh homemade maple syrup was better than I could have imagined.
It tasted like the wood we used to boil it down.
Delicate hints of cedar and poplar, not to mention the smokey flavour that permeated the sauce.
It was like maple syrup straight out of the woods!
It was by no means a highly industrialized effort.
In the end, it was a very time consuming and very laborious labor of love...

...but WORTH EVERY BITE!!!


We are making syrup again this week...so stay tuned to my Facebook page for meals and recipes
featuring the lovely syrup of the gods....


Friday, February 28, 2014

Seed Saving...a first for Us!

Let me just start off by saying we are
an experimental family.
We dabble, we attempt.
Occasionally we have a success!
Normally that's just the result of trial and error.
Often a lot of error.

I like the idea of saving seeds.
I really had no idea where to begin.
To be honest, the whole concept seemed too big to grasp.
It was intimidating.


Husband and I started researching on the web...
in newspaper articles and books.

We took it one seed at a time.
Each plant requires a different plan.
Some plans are as easy as separating seed pod from plant 
and then drying the seeds.

Other plants require a much more thought out process.

Ches was much more ambitious than I was this past year.
He decided to try tomato seeds.


Tomatoes keep their seeds in a gooey substance that actually inhibits the seeds from growing!
You have to force the seeds to germinate by making them start to mold.
Separate seeds from fruit and place in a mason jar.
Fill partially with water and place a porous cloth (or in this case coffee filter)
and secure with elastic band.
Let seeds stand in liquid for a week and then a mold will form on the surface of the water.
When ready to dry the seeds, remove from scummy water and discard the mold.
Dry seeds as per normal.

I'll be sure to let you know if this well researched method pays off in the spring...


All in all we did a great job last year in seed saving.
Peas, jalapenos, broccoli seeds, white corn kernels, purple, yellow and green beans.
Other jars in the above image show dried herbs (not seeds) like lavender, thyme and oregano.
Very important spices in our household!
The lavender is used for tea and respiratory ailments.
The thyme and oregano are staples in our cooking.
We even dried chunks of jalapeno flesh (the red stuff on the right)
...still haven't used it for anything...
but you never know...


We have a couple of black walnut seeds from a past neighbour's yard.
We also have a couple of peach and plum pits (the wild plums I wrote about previously)...


I finally found some rose hips in Pres-Quile Provincial Park in Brighton.
I dried them for tea making purposes...they contain obscene amounts of vitamin C.


The above picture shows something we never did before...
Broccoli seeds!
They form a bizarre little pod with tons of small black seeds inside.
We dried the pods on the screens,
then removed the seeds by hand.


See how small the pods are???


The seeds are totally tiny!
We've never let a broccoli go to seed before..so this past year was a treat.

I'm sure as the seasons go on,
we'll learn more about seed saving.
This past year was more fluky than anything intentional.
I feel it is important to be able to save your own seeds.
Food self sufficiency becomes more and more important as our 
food supply continues to let us down in terms of safety.


Speaking of seeds!

I plan on bringing the some of my seeds to the seed swap on Mar 4th in Tamworth.
The Tamworth and Erinsville Grassroots Growers Assoc.
featuring local celebrities like 
Karen ten Cate of Bumblerock farm, 
John Wise of Wiseacres organic farm in Centreville 
and Brian Burt of Burt's Greenhouses!

Nothing gets me going more than gardening talk in the middle of winter!!!!
Plus we'll be planting our "tropical" seeds this week...like tomatoes and peppers.


Monday, February 24, 2014

Decorating on the Cheap! PILLOW EDITION

I have the spring fever...perhaps a bit early but it is what is it.

I have decided not to fight it...instead I am embracing it.

We have been cleaning up our house.
The inside gets neglected over the summer months.
Don't get me wrong, I keep the place clean.
But the finer details get ignored until the cold weather sets in.
What I mean is that we are filtering out the junk.
The stuff that piles up in corners until you just don't notice its presence anymore.

One of the things that I stopped noticing was the amount of kids stuff. 
EVERYWHERE.
Anyone with kids in their lives knows what I am talking about.
I absolutely HATE throwing good things away.
(and I don't use the word hate very often)
I would rather re-purpose than turf anything if possible.
I am not a fan of being a consumer.

Historically, making old things into other things is not a new concept.
Canada's earliest settlers would use old clothes to weave mats and carpets,
 sewn into quilts, or cut up for use as rags or patches.

These days I have been scouring Pinterest in an effort
to find cheap and hand made ways to re-purpose stuff AND decorate our home.

So this post is dedicated to re-purposing kids pillows!


We had several flying around....spiderman, shrek and sesame street.
Owen says he's too grown up these days.
That removes the guilt of taking away perfectly good pillows.

But that's the best part!
I'm not really taking anything away...
just finding each thing a new role.


While the cold wind whistles outside and the thermometer hangs steadily at -20 degrees Celsius, 
I settled down with a crochet hook and a ball or two of yarn.

I single crochet enough stitches to cover the front of each pillow.
Then, very simply, I single crochet.
Row after row.
Single crocheting means the stitches have very little gaps.
That also means you don't have to line the project.
(You can if you like...or if you have spare fabric laying around)


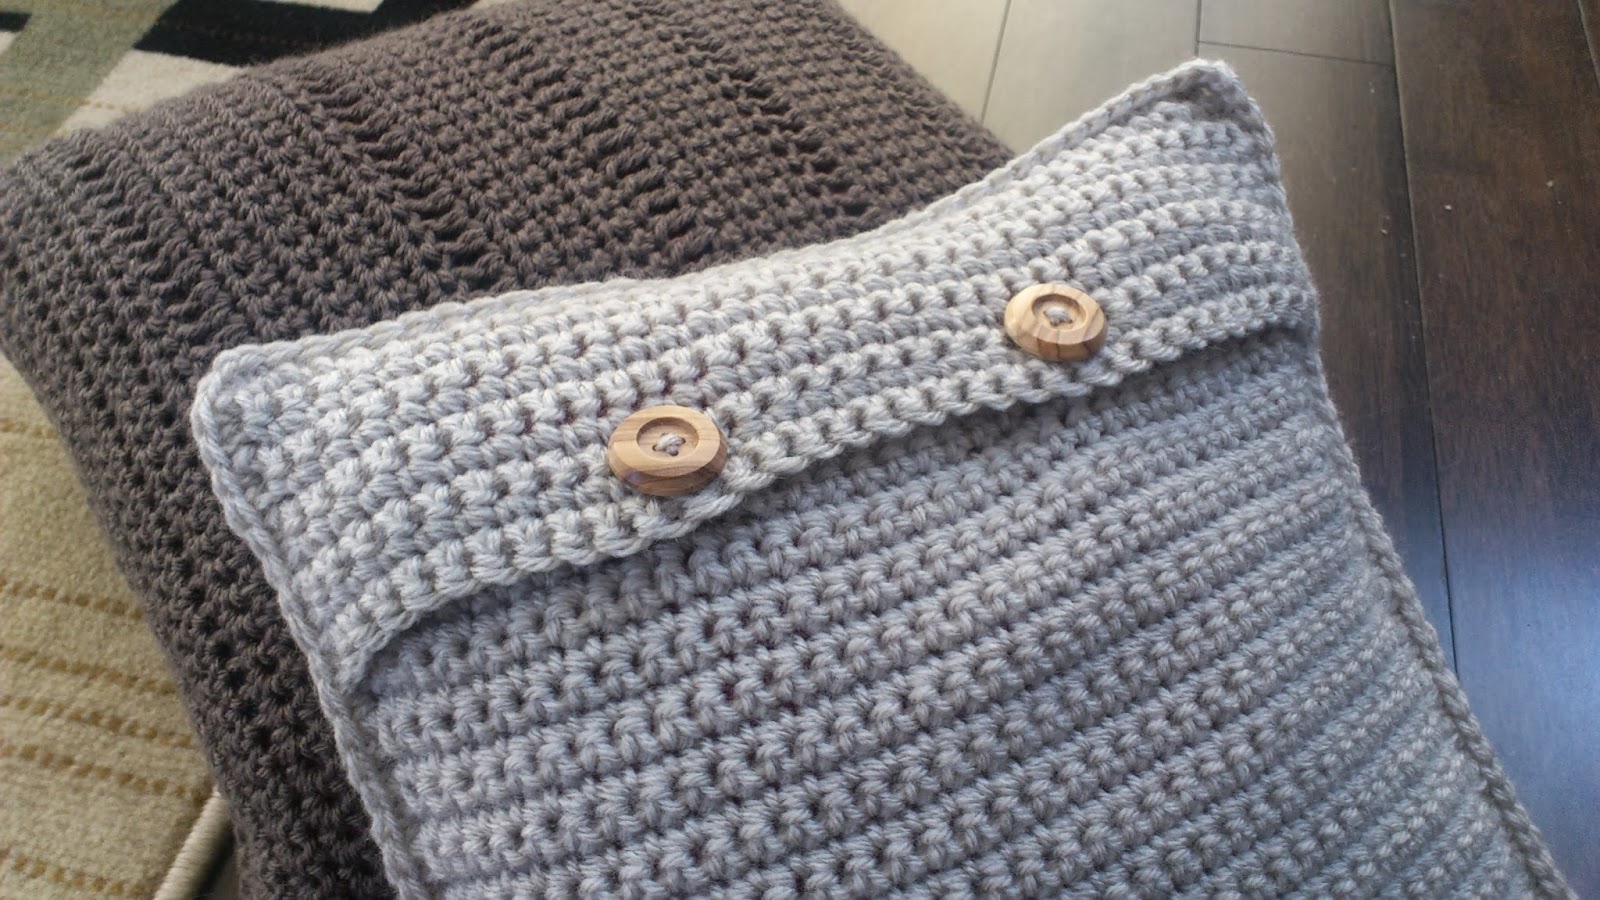
The brownish pillow was made using single crochet for 7 rows then a double crochet row.
Alternating until the entire pillow was covered.
The back of the pillow is the same.
The 2 halves are joined by single crocheting a row around the entire pillow.
I ended up sealing the pillow up inside the cover.
That method is problematic if you plan on removing it for washing.
You would have to undo a side in order get the pillow out.
(I'm fine with that, as the pillow if for me...but if this was a gift...I would consider making an opening)
The linen coloured pillow was made with single crochet stitches as well as a front post stitch.
I adore the post stitch as it makes it look like a cable knit sweater!
The pattern goes like this:
row 1 single crochet.
row 2 single crochet.
row 3 single crochet 7 stitches then front post stitch 1, single crochet 1, front post stitch 1, single crochet x amount of stitches until you are 10 stitches from the other end, front post stitch 1, single crochet 1, front post stitch 1 and single crochet 7.
row 4 single crochet
row 5 repeat row 3
row 6 repeat row 4
alternate the entire front of the pillow going between row 3 and row 4.


For the back of the linen coloured pillow, 
single crochet many rows (same length as the front) until you are 2 inches from the top.
Finish off.
Single crochet another panel but only a few inches long.
Both panels with sort of overlap each other.
The button holes were easy!
I single crocheted 11 stitches, then chain 1, single crochet x amount until you get to 12 stitches from the end, chain 1 and single crochet the rest until finished the row.
Single crochet 2 more rows.
I bought 2 wooden buttons from Michael's craft store for about $2.00 total.
You can use a needle and the same yarn to attach the buttons.
Just line them up approximately where the button holes fall.
Single crochet around the front and back panels and VOILA!

Some pretty stylish pillows I might say!

This pattern was completely made up by me.
Feel free to share, pin, copy and distribute this pattern.
Please link back to this post though...that's all I ask!
(oh yeah, that and please send me pictures of your lovely creations!!!)


Stay tuned for more ways to re-purpose the clutter in your home!


Friday, February 14, 2014

Bloggers to Discover...

I thought I would take this opportunity
to share with my readers
some of the blogs I have discovered lately.

Blogging in a vacuum sucks.
(no pun intended)

I find inspiration from my environment...
from my friends and family...
from the good and the bad experiences in the garden..
and from books and magazines.

I also search the web for inspiration.

You just never know what is going to tickle your fancy
or float your boat
or whatever...

Here goes!

FOR THE PALEO ENTHUSIAST:

http://primalblissnutrition.com/

For the nutrition-conscience folk out there
who want to experiment with the Paleo diet.
(or those who already do the Paleo thing)
This gal blogs the most amazing recipes for the WHOLE family.
(she has great contests too!)

Kathryn of Primalblissnutrition.com

FOR THE LOVE OF BEAUTY AND GOOD PHOTOGRAPHY:

http://bootsandpine.com/

A Canadian photographer transplanted in New York takes the 
most beautiful photos of people in her community.
It really is a love song to humanity sang in photos.

Alley O'Shea by Arden Wray of bootsandpine.com

FOR THE URBAN HOMESTEADER:

http://www.brooklynfeed.com/

A delightful blog about urban homesteading with great recipes and tips.
Her aim is to live a simpler more sustainable life in an urban environment.
I say YOU GO GIRL!!!

Martha of brooklynfeed.com and her daughter


FOR THE FORAGER:

http://firstways.com/

My favorite urban forager Becky Lerner!
She is a blogger, author and plant reiki practitioner.

Becky's latest novel!

She forages for food, medicine and smokeables.
How cool is she????  Check out her blog...
NOTE:  I usually stick with foragers that operate near my area...
If I can't find it in my area..I don't want to know about it...
but Becky is so good that I overlook the fact that she's in Seattle.
(I avoided the Paw Paw Ice cream she posted...mainly out of jealousy
that paw paw do not grow in Ontario)


Hey Readers!
Are there any blogs out there you are reading lately?
Please let me know in the comments...