Showing posts with label peas. Show all posts

Tuesday, August 25, 2015

What you plant and why it matters...

So this year I broke down and bought a bag of pea seeds.
I normally just plant what we saved from last year.
This year the packaging seduced me.
The Heritage Seeds Co.
Brown paper bag shouting
"LINCOLN HOMESTEADER"
I couldn't help myself.

I note that normally I don't care what kind of stuff I plant.
But thanks to my new job growing organic vegetables at The Kitchen Garden...
I know it matters what you grow.


I'll show you the proof.
Above you'll see the pea on the left...is one grown from seed we saved.
The one on right is the Lincoln Homesteader.
I will forever use capitals and call them by their right name...
they are an amazing specimen of shelling pea.

The one on the left (ours) produced poorly and with only about 3-4 peas per pod.
The one on the right (Righteous Lincoln Homesteader) kept pumping out the peas for 5 weeks and produced a whopping 12-14 peas per pod!!!
NOTE:  They then produced a very healthy second blush of perfectly sweet peas in the middle of AUGUST!?!!


That means...
We have 2 large freezer bags stuffed full of peas for the winter.
Dang!
That's the most peas we've ever been able to store!!!
Thank you Heritage Seed Co.
Thank you Lincoln Homesteader.

PS.  We planted another beds of peas two weeks ago...I'll give you 3 guesses what kind...

Monday, July 28, 2014

Trellis Action...

So...a few weeks ago I was struggling with how to trellis my plants.
In my garden update post, I lamented that I had a short amount of time to
think about it...before it became a necessity.

I was able to come up with some completely free solutions!
Let's check them out...

PEAS


We planted two beds of peas...multiple rows in each bed.
One day, as I walked on the shores of Desert Lake, I came upon a driftwood log!
I used other sticks to support the driftwood and 
then laced craft wire to that it formed a teepee like trellis on both sides.
The craft wire was free because I had bought it many many many years ago.
It was for a rock jewelry business that I tried.
In the end it was a trellis for some old windows we got from the dump.
I carefully unhooked all of the wire...and repurposed it!


The second bed of peas had the same treatment...for I was shocked to time a second driftwood tree!
This tree was shorter...so I made up the difference with some broken old wire tomato cages.


The shot above is probably the best to see the wire...can you see it?


I got creative by the second trellis...attaching the log to a piece of firewood set in a mix of daisies and asters.

SQUASH


The squash trellis solution was actually Handsome Husband's idea!
I had already removed the wire from the dump-scavenged windows...
Ches said "Why don't we put them on pieces of wood?"
Works for me!
Above you can see how much the enjoy the partial shade on their roots...
and all of the climbing room on the windows!


The windows aren't actually that far off of the ground...only a few inches.

BEANS


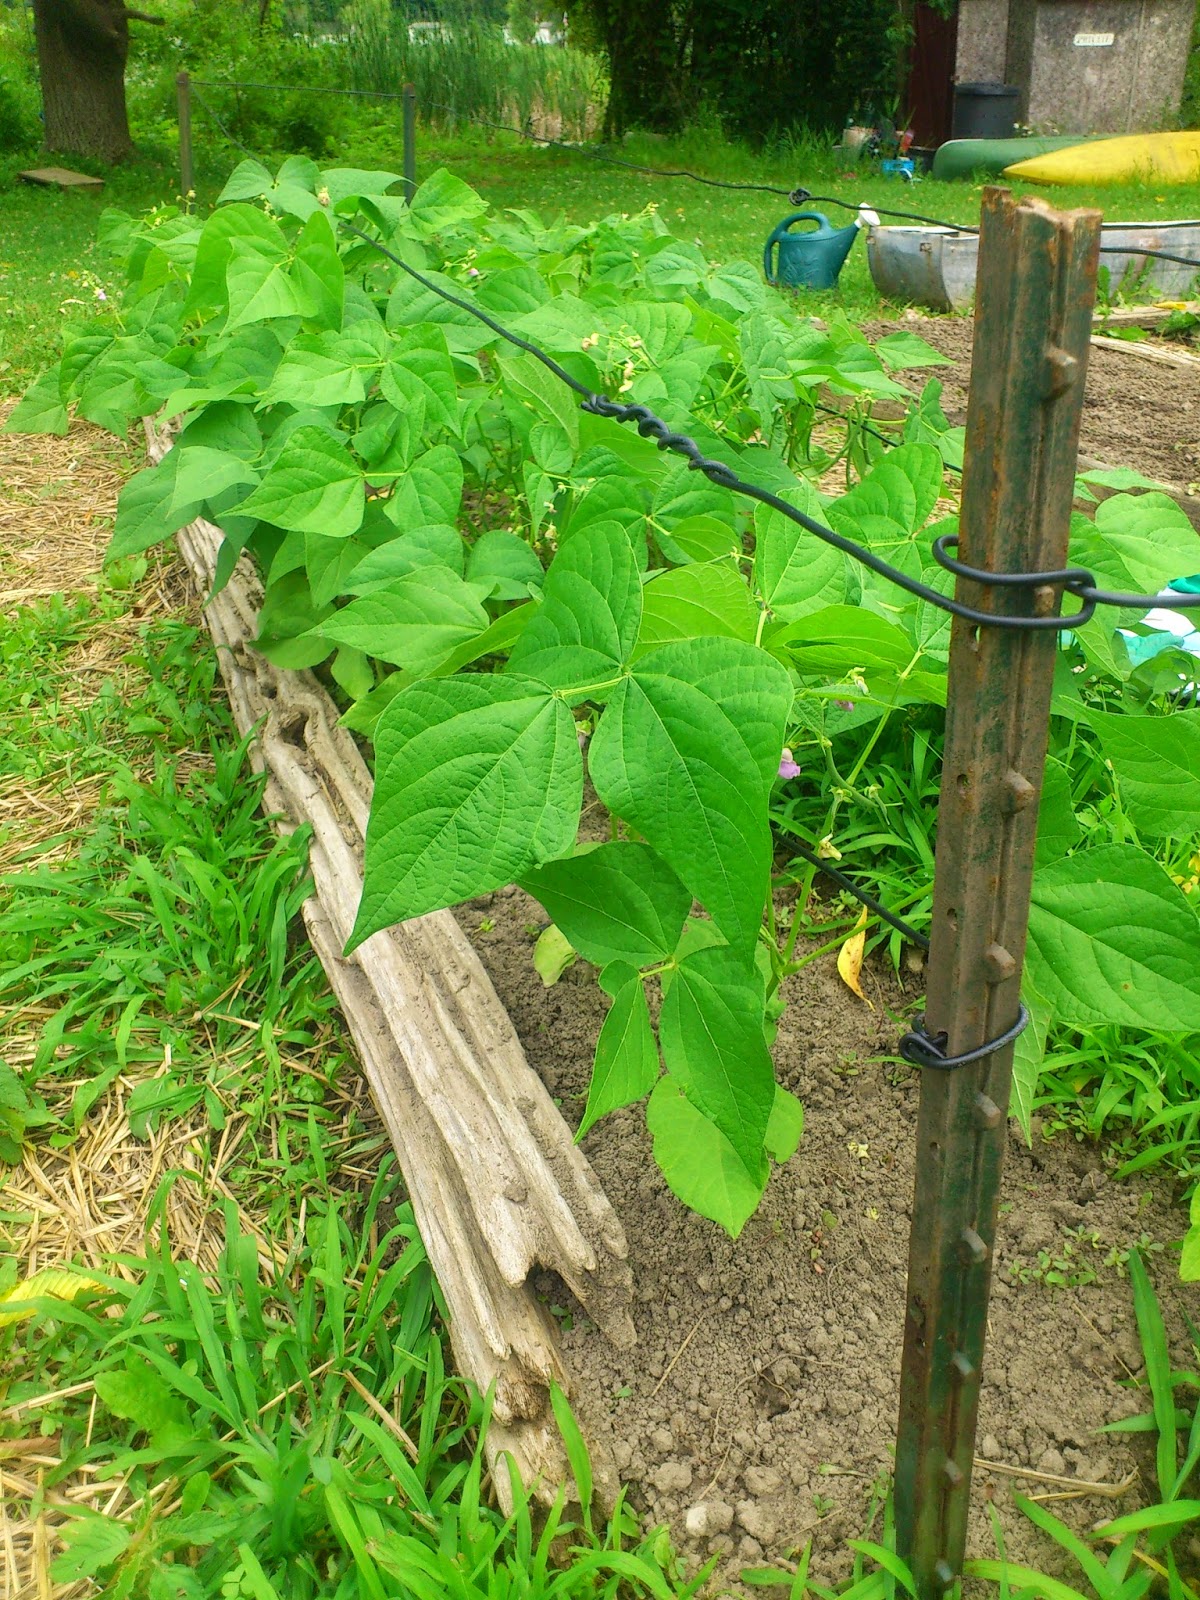
The beans don't necessarily need a trellis...
but sometimes they fall over and you're scraping the dirt for your beans.
Not my idea of fun veggies...
So we built a cage of sorts!
The t-bars came from a family friend.
The wire was repurposed invisible fencing!!!
Can you believe we have dug up the equivalent of a whole spool on 
our property compliments of previous owners?
True story.

CUCUMBERS


Above is our trusty machine.
Its made of old t-bar and metal chain-link fence found at a former house we rented in Verona!
You pound the t-bars in on an angle and plant the seeds "under" the angle.
The plants grow up the chain link and voila!
Dirt free veggies!
It has been so successful in the past...beans, cukes...whatever trails!

PUMPKINS


I still haven't figured out what to do with the pumpkins...but they are filling in too quickly now
so I think I'll just leave them this year.
They seem to like the saddle-shaped lattice!


If you want more (way more!) trellis ideas...
you can now follow me on Pinterest!
(Psst I have a whole folder of trellis ideas!!!)

Once there, you can find all of my recipes and food photos in handy dandy folders too.


Thursday, June 26, 2014

UPDATE: Garden 2014

So here is our garden for this year....
It's bigger!
It's badder!!
It's all ours!!!

Above is the plan we created while planting.
We used the "Carrots Love Tomatoes" plan and adjusted it where necessary.
Some plants we already had planted in other areas of the yard, so we
weren't able to adhere to it very strictly.


The above shots are of our red and white potatoes.
The metal bin at the back is actually filled with spare soil.
Potatoes need to be mounded as the get taller...so we save
some dirt for that purpose.


Red and white onions in the above shot.


Many jalapeno plants as some other hot peppers at the front.


Our field of tomatoes!
There are 24 plants in this area, some romas and some hertiage varieties.
While I am loving not hauling water, the tomatoes are not loving all the rain we've been having.
Can you see the leaves that are yellowing at the back?


Heritage white corn...we grew it last year and saved the seeds
for this year!  Looks like it worked!!!
(we found the wood under our pile of logs for the campfire...
nicely repurposed to keep the weeds down)


Directly to the left of the corn are our two sweet potato plants!
We tried growing sweet potatoes once in 2011...
it didn't turn out then...so we thought we'd try again!
The last time the plants spent the whole growing season just trying to grow leaves!
The bunnies thought the leaves were mighty tasty...so the plants never got a chance to grow tubers.


Our yellow zucchinis are starting out great!


The green zucchinis...not so much...


We dismantled a black composter...and filled them with dirt.
The sides have slots...so you don't have to worry about the plants drowning
in rain water!  Score!


Our pumpkins...with one sad trellis...
I have to get me some T bars and do these
trellis thingies right!


The radishes are coming along...


The beets are shy.
We planted dill with them (as per the book)
and the dill likes the bed...
NOW WAKE UP BEETS!!!


Our cucumber machine makes its triumphant return.
We had such a great year with cukes last year.
We're taking a small break and only planted about a dozen of them this year.


Our kale seems to love it here!
The swiss chard on the left hand side of the bed...not so much.
I want to make kale chips so badly...
mainly so I can see what all the hype is all about...

\

Above shows our salad bar!
We have 5 different packs of lettuce and salad greens sprinkled
in this bed.  We forgot almost instantly what kinds we planted...but does it really matter?
SALADS!


Our spinach bed is pretty pathetic right now...
Hopefully it will make a come back...
or a decent fall crop from a second planting...


We have 2 rows of peas this year...cuz why not?
No seriously...we love peas.  
Especially sitting in the garden eating them straight out of the pod.
Each year we plan to store some in the freezer...and sometimes we actually do!
This year I am determined to get a whole large freezer bag full!

We also have to get to work on trellises (or is it trelli!?) for these peas.
Pea plants have a tendency to fall over and grow in the dirt.


We saved beans from last years crop.
We have no idea which beans are which...
but in this bed are green, yellow and purple wax beans.


Finally we have our acorn squash.
Again with the sad trellis...

So I've been pinning a TON of trellis ideas.
I will be posting soon with the results of my adventures into trellising.
(Trellising?  I have no idea...but you'll see some cool stuff for sure!)


I have to admit...last year we didn't plan much.
In fact, I made the mistake of having a few libations while planting seeds.
The result was that I had no idea what I planted and where.
(Laugh all you like)
It was a surprise when everything started growing...which was funny for about a week.
(oh who are we kidding...I'm still getting ribbed for that!!!)


Don't forget to send me your garden love!
I want you to post photos of YOUR gardens on my facebook group and page.
Lets celebrate our accomplishments together!!!


Wednesday, November 27, 2013

Hamburger...the Never ending Story

I love an odd cookbook.
I have so many of them...

It's like a fixation really.

I managed to pare the collection down when we moved into 
our current home.
I was not going to be the one with 100 boxes of cookbooks.
No way.

One of the books I knew I'd be keeping is shown below...


Behold!

Published in 1960...this cookbook holds no less than 38 pages of meatball recipes alone!
Meatloaves, burgers, casseroles, soups and sauces.
One of the things I love about this book is that there are specific recipes for up to 100 people.
Not all cookbooks do that, incidentally.

So the other night I figured I would thumb through it and
find a meatball recipe.
I had some ground beef leftover and couldn't really figure 
what to make with it.

I stumbled across Danish Meatballs with Mashed Potatoes.


2 lbs hamburger
1 1/2 cups chopped onion
2 eggs, slightly beaten
1 tsp ground nutmeg
2 tsp salt
1/2 tsp black pepper

Mix all ingredients and form into 1 1/2 in balls.
Roll the meatballs in 2/3 cup flour seasoned with 1/4 salt and 1/8 tsp black pepper.
Brown on all sides in 1/4 cup cooking oil.
Add 1 cup beef stock and 1 bay leaf.
Cover and simmer for 30 mins.
Remove meatballs and set aside.
Blend in 3 tbsp flour and brown. 
Stir in 1 1/2 cup bouillon.
Cook, stirring constantly, until medium thick.
Serve meatballs and gravy with mashed potatoes harvested from our garden.

The end result was a warm yummy dish.
The nutmeg made a beautifully different gravy.
I served this dish with a side of green and yellow beans 
and peas frozen from our garden harvest.

This meal was perfect after a day of yard work on a cold afternoon.
It certainly balanced out the sight of our pond frozen!

We don't eat a ton of red meat...but when we do, we do enjoy the comfort and flavour.
When you buy local meat, you can be sure of the quality.
(Compared to those factory facilities who sell to grocery stores)
Plus, this is a great way to make your grocery dollars go farther!


Stay tuned for more ways to prepare hamburger...for those aficionados of hamburger everywhere.


Monday, August 5, 2013

UPDATE: Third Installment of the Garden progress

Although our bounty is a bit behind...it still looks luscious!!!
It only took my husband and I working for about 7 days straight to get the whole area weeded.
(The image below shows it only about halfway weeded)
Methinks if we are to expand the garden at any point - we will have to 
think about alternatives to manual weeding.


Can you spot the husband in the back?
Weed picking in the big garden one evening.

So far this season, I've only posted far back shots of the garden as a whole.
(like the image above)

Here comes the veggies!
(They're ready for their close ups...)


CORN:  Our white corn plants...waist high!


CUKES:  Our cucumber machine...nothing to it...just an old chain-link fence with 
steel rods driven into the ground on an angle.  They are starting to get the idea...


The lovely little cucumber flowers are teasing us!!!
We planted both pickling and English cukes.


BRUSSELS SPROUTS:  ...a first for us!


BEANS...green, yellow and purple...but the green ones outnumber the rest.


CARROTS...we planted the leftover purple carrots from 2 yrs ago...but apparently the purple fades away.  All of the purple carrots I thinned out of the row were definitely orange.
Maybe the purple colour comes later?  Stay tuned...I'll let you keep you posted...


BEETS...coming along just fine.  After I thinned them, I was left with more room for the beets to flesh out and some amazing baby beet leaves for salads.


PEAS:  First round of peas in tomato cages did alright, but I wasn't satisfied with the amount of plants. 


So we planted a second round of peas with hemp string supports...can't wait!


BROCCOLI:   transplanted from sister-in-law Sally's garden...doing well!


GARLIC:  we planted garlic and got loads of purslane as well!


ACORN SQUASH:  We wanted more squashes to store for the winter.  We've already experimented with butternut - now we roll the dice on acorn!


ZUCCHINI:  Green zucchinis taking off - finally.


A prized zuke!!!  I really can't wait...these are a favorite summer nosh


TOMATOES:  We planted tomatoes in different stages...the ones on the right hand are a few weeks ahead of the ones on the left.  That should mean we won't be drowning in "maters" all at once.


ROMAS!


As you can see, our haul this night is small but productive.
A rainbow of colours!

A few things we planted did not come up.
Like I said, we're working with seeds we kept from 2 yrs ago...so I'm just thankful
anything came up!  Parsnips and flying saucer squash did not take at all.
Not sure if the seeds just went "stale" or if our seed storage techniques are flawed.
More research will have to be done on this subject, I'm afraid.

There is a bonus this time of year.
As you work away in the garden, you are also able to grab extra stuff you wouldn't have expected!
Whether you use seeds or seed tape, when you plant carrots and beets...you will have to thin out the harvest before they start establishing themselves.

So while you are thinning out the crop (so the veggies don't crowd each other),
you can harvest some baby beet leaves and baby carrots!
I hate to waste anything and, even more importantly, there is valuable vitamins in them babies!


How does your garden grow this year?